Showing posts with label Sam. Show all posts

Monday, 17 September 2007

Vespid Tactica

Vespids - are they hideously fragile fliers or MEQ* killing superstars of the highest caliber? In this article I will examine their use on the tabletop, and suggest tactics for their use in games of 40K.


From the forum posts and articles that I've read, it seems that a lot of people really, really hate the Vespids. They complain that the guns are short range, they have too low an armour save, they are dire in close combat and most of all, they hate having to pay 16 points for each model! Yet, I've found that if they are used in the right way they are a fantastic reserve unit that can really ruin a marine players day.

OK, now I've waffled for a bit, lets look at their rules.

Movement

Vespids are jump infantry, therefore moving up to 12" each turn. They also have the Fleet of Wing ability (potentially adding another 6"), meaning if they wanted to assault then they could move a total of 24" - not too bad.

Add to this the idea that they are skilled fliers. With this rule they get to re-roll any failed dangerous terrain tests, meaning they could simply skip through dangerous terrain if you wished it. This is a very handy ability to have for flanking, if your gaming group uses dangerous terrain.

Shooting

Now lets add the guns - their 12" range means they need to be staring into the eyes of the opponent, so every shot counts here. They can practically kill anything, but you need to ensure the enemy is dead by the end of that shooting turn, or returning fire and close combat will destroy them. I recommend markerlighting the target unit for them, they'll be much more likely to destroy the enemy and survive to shoot again

What can we do with this unit?

Reserve Unit

My first idea is a reserve unit - they are born for this role. Keep them out of the enemies sight, preferably near to any static units of Fire Warriors. When a close combat unit attempts to get near them (like Assault Marines), the Vespid unit will fly out of their hiding place. Markerlight the incoming unit, increase the vespids BS and let them pummel the target squad to a fine paste. Any models that are still alive can then be mopped up by the fire warriors, and if that doesn't kill them the Vespids could charge them, using their high initiative to their advantage. 9 times out of 10 there would be no enemies left by this point.

Surgical Deep Strike

Pretty simple tactic - simply deep strike as close as possible to the most expensive enemy unit on the table (that has 3+ Armour), and cause as much damage in one turn of shooting as possible. If you hit an expensive enough target you can easily make twice the Vespids points back.

This tactic once helped me successfully wipe out a death company. Yes the company could be claimed to cost not that many points, meaning that points for points the Vespids didn't make their points up, however, they eliminated the biggest threat to the Tau - something that I'm sure any player who has fought blood angels are all too aware of.

Flanking Force

My next suggestion is a flanking force. With the potential to move through almost any terrain with relative ease, the Vespid can out flank and maneuver around most forces, hitting them and exploiting their weak points, something that would be great against most tanks. You should use terrain that blocks LoS to avoid being shot at - at least get a cover save on the go. At a critical point in the game you should reveal the Vespids and cause as much damage as possible, again using Markerlights to your advantage.

Evaporating Flank

A suggestion I've seen someone put was the evaporating flank technique. Set up the Vespids away from everyone else, draw the opponent towards them, then fly away, leaving you free to deal with the rest of the army. If you're lucky it will work, although most players will either ignore them or use long range weaponry against them.
Points to Remember
- Always use them against models with Armour 3 or above, to take best advantage of their high AP.

- Avoid the enemies fire as much as possible, even the humble Lasgun can chew through Vespids.


- Use squads of 11 where possible, to make this unit as survivable as possible.

-Alternatively, use 2 small units of 5 to split the enemies fire
(although this also splits your markerlights!)

- Use markerlights where possible, this can almost double the number of enemies killed!


So to sum up, yes vespids have dire close combat, short range of guns and are extremely fragile - but used well they make the perfect supporting unit for the Tau Empire army.

-Sam

*MEQ = Marine Equivalent, Models with T4 and 3+ Armour.

You might want to check out the Games Workshop page on Vespid Tactics also.

Monday, 10 September 2007

2000 points of Tau

Well I decided to write up a list for the next battle to try and combat either Space Marines or Eldar. Its just a slight deviation of my standard list with a few things that I would like to try:

2,000pt Tau List

Command Squad

Shas'O with plasma rifle, missile pod, shield generator, multi-tracker, drone controller with two gun drones and stimulant injector
Shas'vre with twin-linked plasma rifle, shield generator, target lock & drone controller with two gun drones.
Shas'vre with twinlinked missile pod, shield generator, target lock & drone controller with two gun drones.
They are bonded.

Stealth team 5 Stealth Suits, one upgraded to shas'vre with fusion blaster. Bonded

Monat -Shas'vre with air burster fragmentation projector, burst cannon, shield generator with multi-tracker.

3 Fire Warrior Squads Each have 12 members, with an upgraded Shas'ui. The Shas'ui has a markerlight and target lock. The teams are bonded.

Vespids 1 Strain leader with 10 Stingwings

Pathfinders with Devilfish 6 Pathfinders with upgraded Shas'ui. 3 have rail-rifles
The Devilfish has decoy launchers, a disruption pod, multi-tracker, targetting array and target lock

Hammerhead Railgun and burst cannons. Also has decoy launchers, disruption pod, multi-tracker & target lock with a blacksun filter

Hammerhead Ion Cannon and smart missile system. Also has decoy launchers, disruption pod, multi-tracker & target lock with a seeker missile

Sniper Teams 2 Sniper teams

Total - 2'000pts


Basically, I've modeled my army to be good against most things. I love the command squad. Most people hate the idea of putting too many eggs in one basket, but this kitted out squad can just about take any unit on - marine hunting with the plasma, tank busting with the missile pods and mass infantry killing with the drones and other weapons, plus they're hard as nails. The gun drones can be expected to die, however they do help add more shots to the unit and obscure the suits.

My stealth team is my signature piece. I love these guys, partly because everyone else hates them. They pop out, shoot you and pop back again whilst you find it extremely hard to hit them because of the stealth generators. I upgraded them with a fusion blaster in case I have to go tank hunting too, although looking at the amount of tank piercing guns I have it shouldn't be too bad unless I'm against the land raider (which I may be playing either alongside or against next game).

The Monat can be changeable if need be, this is my mass infantry killing unit and the bane of Eldar Guardians. The fragmentation projector ignores their armour and any cover save before pinning them. He would be good as well if any marine squad bunches up.

Fire Warriors are my usual fire base, 3 squads should provide some nice covering fire as well as some useful markerlights.

Pathfinders are an interesting unit. They function both as a sniper unit and as a markerlighting one. Their rules provide easy deep strikes and allow my pathfinders to come up with an extra move before the start, useful sometimes if I want to deceive the opponent as well as making the devilfish automatically become a unit which you have to glance rather than penetrate.

Vespids are the reserves. With their fast movement and short range marine hunter guns, they will protect the fire warriors against assault squads such as the death company. With markerlights these guys are renowned for destroying large chunks of squads in one turn of shooting.

Again two hammerheads, with two different functions. You may have noticed the rail-gun one has a blacksun filter. Considering the different types of games and the chance of having a night fighting game, I thought it wise to equip it with a blacksun filter so it could see a maximum of 72 inches (4d6 * 3), the maximum range of its gun and be able to hide away from those tank hunters. The battlesuits have acute sense, making them likely to see fairly well whilst the other hammerhead can fire up to 24" guaranteed with its smart missile system.

As for the snipers, in the last battle they certainly scared Brad and Gav as well as distracting them. As a result I will use them to either draw fire or do some damage to any squads getting near me.

Hopefully this should be a good list.

- Sam

Thursday, 23 August 2007

General Update

We've had another game of 2'000pts today, with Blood Angels and Tau battling it out. I controlled half the Blood Angels army, Brad controlled the other half and Sam controlled the Tau. Result was a Solid Victory for me and Brad, we managed to capture a quarter which won the game for us. It was close though. The lists used were more or less the same as the last battle posted.

I'm roughly half way through my Sniper Scouts squad, expect them to be posted as soon as I have some time off work. Alex's monolith is getting there and Sam has discovered the joys of Dark Crusade, although he can't play it online. Friday night will be a 2,000pt battle between Brad's Eldar and Sam's Tau, which will probably be the last game for a while.

-Gavin

Wednesday, 15 August 2007

Tau vs Blood Angels

Well after the defeat the other day, my Tau have decided to hunt down and exterminate the hated Blood Angels, the primary threat of the Tau due to their brutal close combat abilities. The Tau Commander, Shas'O Ukos, leader of the campaign has decided to meet a small force of Blood Angels and hopefully wipe out some reinforcements using fast mobile Tau battlesuits and auxiliaries combined with the firepower of 4 Fire Warrior teams and some tanks

My list is as follows:

Shas'O Ukos
Plasma Rifle, Missile Pod, Shield Generator, Multi-tracker, Drone Controller, 2 Gun Drones, Stimulant Injector

Bodyguard

Tor, Twinlinked Plasmas, Shield Generator, Drone Controller and 2 Gun Drones, bonded and with a target lock

Kor, Twinlinked Missile Pods, Shield Generator, Drone Controller and 2 Gun Drones with a target lock


Elites

5 Stealths with Shas'vre and are bonded, one with a Fusion Blaster

Shas'vre, Plasma Rifle, Missile Pod, shield Generator, multi-tracker, bonded

Troops

4 Fire Warrior Squads with 12 men, Shas'ui, markerlight, target lock and bonded

Fast Attack

6 Pathfinders with a Shas'ui, bonded and 3 have rail rifles as well as having photon grenades

Attached Devilfish with Target Array, multi-tracker, 2 Seeker Missiles, Decoy Launchers and Disruption Pod

10 Vespids plus a Strain leader

Heavy Support

Hammerhead 1- Railgun with 2 Burst Cannons, multi-tracker, target lock, disruption pod, decoy launchers and 1 seeker missiles

Hammerhead 2- Ion Cannon with Smart Missile System, multi-tracker, target lock, disruption pod and decoy launchers

I'm hoping that these prove an effective element against the fast Blood Angels army, being able to dodge and whittle down the forces against them.

- Sam

Monday, 13 August 2007

Mega Battle - The Report

This is the Mega Battle we had on Tuesday 7th August, 2007. In one corner we have Sam, using 4000 points of Tau. Facing off against this hideous amount of firepower, we have a combined Eldar and Blood Angels list, split evenly into two 2000pt detachments.

The Forces

Sam's 4000pt Tau List.

Brad's 2000pt Eldar List

Gavin's 2000pt Blood Angels List

The Terrain

We took it in turns to cover the board with terrain. A large ammount of boulders obscured Sam's firing in the centre of the board, to the left of the board was a trench system made up of sandbag walls, with a large ruined building positioned on the right side. There were also a few pieces of light cover scattered around, with a few columns to hide behind.

The Deployment

We were using the escalation rules in this game, so only the infantry started on the board, with the exception of the pathfinders and their devilish. Team Brav won both the rolls to choose board side, and deploy first.

Brad deployed 2 Farseers, 4 squads of Guardians, one squad of Scorpions and one squad of Dark Reapers. The Dark Reapers hung back in some light cover from which they rained death throughout the game. One squad of Guardians and a Farseer stayed back to support them, with the other Farseer leading the 3 squads of Guardians in the ruins. The Scorpions hid in the rocks, very close to the Tau lines (thanks to infiltration!).

Sam deployed 3 full Fire Warrior Squads, a full Kroot squad, a pathfinder squad (with Devlifish) and 2 squads of Stealth Suits. The Fire Warriors lined up in the best firing positions available (only one squad made it to cover), the pathfinders scouted to the left side of the board to snipe from, and the Kroot deployed in front of the Fire Warriors to protect them. On the right side of the board, the Stealth Suits infiltrated towards the ruins, hoping to wipe out 3 squads of Eldar as early as possible.

Gavin's whole army must have been in a Battle Barge or something, because they weren't on the board at all!

Sam rolled first turn.

Sam Turn One

  • Stealth suits move into ruins occupied by a squad of Eldar Guardians, thanks to their infiltration move.
  • They kill 6 Guardians, forcing the squad to flee - somehow they rolled a 12 on their Ld test!
  • The Scorpions are marker lighted by a Fire Warrior Shas'ui - the rest of the squad could not shoot.
  • Another unit of Fire Warriors kill 3 Guardians standing just outside the ruins.
  • The Kroot use marker lights to fire on the infiltrating Scorpions, killing none of them, even with a barrage of 28 shots!
  • The Devilfish also attempts to kill some Scorpions, killing none at all.
  • The Pathfinders use their Rail Rifles to snipe a single guardian on the other side of the board.
  • One squad of Stealth suits moves back to hide, leaving the other unit trapped in difficult terrain.

Sam

In this turn, instead of getting the kroot to go forward, I should have left them behind the fire warriors so that the Scorpions would have had to charge the fire warriors instead and on the next turn, counter charge with the Kroot which would have wiped out the scorpions according to the calculations I did later.

Brad
In my opinion, the Kroot wouldn't have wiped out the Scorpions anyway, but it certainly was a big mistake moving them forward, and Sam paid dearly for it.

Brav Turn One

  • The fleeing Guardians don't rally, moving further away from the carnage.
  • The other 2 squads of Guardians close in on the stranded Stealth Suits.
  • Scorpions stalk the Kroot from the safety of the rocks, ready to pounce.
  • The lead Farseer casts Eldritch storm on the Fire Warriors and Kroot, who are about to be crushed by the Scorpions. It kills only a Kroot and a Fire Warrior - he makes up for this by casting Fortune on a nearby guardian squad.
  • The Dark Reapers kill 5 of the 6 pathfinders, in a glorious turn of shooting. The Shas'ui passes his all alone test.
  • A Missile from the Guardian squad defending the reapers destroys the Devilfish in one shot, with 2 Gun Drones escaping.
  • The Eldar Guardians in the ruins kill 4 Stealth Team members from the stranded squad, with the last one falling back.
  • The Scorpions charge, killing 8 Kroot. The shocked Kroot fight back by killing 2 Scorpions. The Exarch then kills one more Kroot with his Scorpions Claw.

Brad
Yeah Sam pretty much got mowed in this turn, there's no two ways about it. The only thing I would say was particularly lucky was taking out the Devilfish in one shot. Can't believe that one Pathfinder survived the Dark Reaper fire, and didn't even fall back.

Gavin
I did nothing in this turn, but it looked as if it was a good start for the Eldar. Combat on the first turn is something you only usualy dream about when fighting against Tau.


Sam Turn 2

  • Sam's Tau get some reinforcements - the Hammerhead with Rail Gun, Broadside and both Monats.
  • The last Stealth Suit from the stranded squad runs off the board.
  • A squad of Fire Warriors retreat a safe distance away from the melee involving the scorpions - but it won't be far enough!
  • The Broadside sniped a Guardian, on the other side of the board, with a Railgun.
  • The Hammerhead missed all it's shots.
  • The squad of fleeing Guardians were pinned by Gun Drones, stopping them from leaving the board!
  • Sam measured the range on a guess range weapon, so we counted it as not firing.
  • Combat - Sam loses 7 Kroot, Brad loses 1 Scorpion. The Kroot flee, the Scorpions consolidate.

Sam
I forgot to use my Stealth Suits bonded rule..... 2 mistakes so far!

Gavin
Thank god that the Kroot fled in Sam's turn, leaving the Scorpions safe from Sam's firepower.

Brav Turn 2

  • Brad's Fire Prism arrives to join in.
  • All of Gavin's Blood Angels with jump packs arrive - but far too early! 3 Squads deepstrike into the heart of Sam's army, hoping to engage his men in combat before too many Tau reinforcments arrive.
  • Since they can't charge, the Blood Angels shoot, killing one single Fire Warrior. The Death company try in vain to penetrate the rear armour of the Hammerhead with Pistols.
  • The lead Farseer kills a Monat's Gun Drones with Eldritch Storm.
  • The Dark Reapers kill 8 Fire Warriors in one volley.
  • The Fire Prism annihilates 6 Fire Warriors in a single shot! Points well spent.
  • The Scorpions charge in again! They kill a whole unit of Fire Warriors, and move on into a second unit of Fire Warriors.
  • The Guardians in the ruins charge the Monat who still has his Drones, killing the drones.
Brad
I was loving the Fire Prism shot in this round, as soon as it arrived it kicked some ass, just a shame it went down so early in the next round.

Gavin
I was worried at this point, and doubting the wisdom of Deep Striking my entire army. The game rested on Sam's reinforcements in Turn 3, if he managed to drop enough Crisis Suits he could wipe out my army in one turn - if he failed his reserve rolls, I could tear the still beating heart from the corpse of his army!

Sam Turn 3

  • Tau Reinforcements - Second Broadside, Devilfish with Fire Warriors, Auxiliary Command Squad, Vespids
  • The lone Pathfinder markerlights an Assault Squad.
  • Death Company are markerlighted once out of 3 attempts from Shas'uis.
  • The last Stealth Team open fire, killing 5 Guardians
  • The newly arrived Vespids use the Markerlights to kill the whole Death Company. There is much rejoicing from Sam, and Gavin will probably have nightmares about Vepids for the next few weeks.
  • The Commander and his bodyguard finish off the Chaplain. The Fire Warriors finish off the Assault Squad. Sam celebrates, he's wiped out half of Gavin's army already!
  • The Broadside destroys the Fire Prism in a single shot. Sam reaches a state of oneness with the universe.
  • Combat with the Scorpions continues, although we forgot who killed who!

Sam
My best turn here. I managed to seriously do some damage to the Blood Angels, meaning that the following turn, the assault squads couldn't do anything to me. I also managed to down the Fire Prism, something that would have caused a lot of havoc. In all, the dice were with me here.

Brad
There were many tears in the Brav camp in this turn. I can't believe Sam's Vespids came on - as soon as we saw them, we knew there was going to be some maulage. Also it seems we forgot to write down the combat with the Scorpions, I know one of the Scorpions died, and several of the Fire Warriors did as expected.

Gavin
Bugger. At least one assault squad was left alive, and Mephiton was unscathed.

Brav Turn 3

  • The Wave Serpent joins the battle.
  • Gavin's single Tactical squad and his Devastators arrive by drop pod, and his Terminators teleport onto the battle field.
  • Mephiston suffers a wound trying to summon wings of sanguinius. WTF?
  • The Devastators open fire and kill 8 of the 10 Vespids! The Terminators follow suit, and a Crisis Bodyguard falls to assault cannon fire.
  • The Tactical squad shoot at a nearby Fire Warrior squad, 6 Tau die and the Plasma gunner suffers a fatal overheat.
  • The Dark Reapers kill 3 Fire Warriors, a pretty poor performance. A Guardian Squad kills the destroyed Devilfishes Drones.
  • The newly arrived Wave Serpent stuns the Hammerhead with Railgun, making it easier to destroy next turn.
  • Mephiston suffers a wound summoning the Might of Heroes.
  • Gavin regrets spending so many points on Mephiston
  • The Guardians in the ruins engage a Monat and Stealth Team in combat, killing the Crisis for the loss of one man.
  • The Crisis engaged by Mephiston is killed by a lowly Guardian! Mephistion is officially useless.
  • The Scorpions finish the turn by killing 3 Fire Warriors in combat, losing none of their own.

Sam
Ow, this turn wasn't too good in combats. The Hammerhead was open to some good movement from Brad which was why it got mauled quickly. Nice to know Mephiston likes me so much he gives me points :D

Brad
A pretty decent performance from the Guardians in this round, I was pleasantly surprised. Yet again Gav's luck fails us, no idea how Mephiston managed to wound himself twice, it was so unlucky.

Gavin
No comment.

Sam Turn 4

  • All of Sam's army arrives, apart from the last Hammerhead.
  • The last few Kroot regroup, after running several miles.
  • A newly arrived Crisis Suit fails to blow up Wave Serpent from behind, proving once again how hard the Eldar tanks are.
  • 5 Devastators fall to the Vespids and Crisis Teams firepower.
  • Only 4 of the 5 Terminators fall to the combined fire of the honor guard and 7 Crisis Suits armed with Plasma and Fusion weaponry, leaving Sam furious.
  • Sam's Commander and Bodyguard charge the Devastators, and the bodyguard is wounded. The Vespids offer support, but no Marines die to their pitiful blows.
  • Combat - Farseer kills a Stealth Suit. Stealth Suits kill a Guardian. Scorpions kill all but 1 Fire Warrior, who flee. Scorpions run him down, and charge into a Broadside.

Sam
The aim of the Vespids was to hold up the Devastators in combat, along with the squad in there with them. It meant that they didn't shoot any heavy weapons for the entire game. It was a pity the last terminator didn't fall though. This would have meant that the Honour Guard might have been able to deal with the assault squad more effectively. The good thing is that my Broadside got into combat, meaning I effectively pinned the scorpions in place so that later on, my kroot could finish them.

Brad
I pretty much only charged the Scorpions into the Broadside here because he was the only enemy close, and they would have fallen to gunfire anyway.

Gavin
I think Sam made a fatal error by charging his suits in. Even Devastators outclass Tau in close combat, all Sam managed to do with that charge was sign his commanders Death Warrant. I was very impressed by the resilience of the Terminators, not many 5 man squads can survive that kind of firepower and leave a man standing.

Brav Turn 4

  • Gav's Baal Predator arrives as reinforcements.
  • The main Farseer casts fortune on himself and the warlock aiding him.
  • The Dire Avengers disembark and charge a Crisis Suit.
  • Mephiston finally passes a psychic test and flies to aid the Farseer in combat.
  • Gavin forgets to shoot his Baal.
  • The assault marines move into position to attack the honour guard.
  • Combat - Assault Marines kill 9 Honor Guard, Terminator does jack shit. The Tactical Marines kill Commanders Bodyguard. Mephiston kills none, but Honor Guard kill 2. The Dire Avengers kill the Crisis suit they were fighting. The Broadside kills the last Scorpion, the Exarch kills a drone.
Gavin
He he he, that is the kind of combat I want! 9 Honor Guard killed in the charge is a fantastic result.

Sam Turn 5

  • The last Hammerhead does not arrive! Team Brav almost cheer.
  • Sam finally silences the mighty Storm Bolter on the Drop Pod, by blowing it up.
  • Broadside trys to kill the Baal, but is pitiful and fails.
  • The other mighty Drop Pod is annihilated.
  • The Baal is hit by a Seeker Missile, but survives.
  • The Kroot charge the Lone Scorpion exarch, and kill him.
  • The remaining Crisis suits charge in to assist their commanders in the melee.
  • Assault Marines kill the ethereal, and move in to assist the terminator, just as he dies.

Sam
I needed the terminator to die in my turn. If he had, without the Honour Guard firing at him, it would have resulted in the honour guard being able to fire on the assault marines, doing some damage at least.

Brad
Finally the Scorpions die, but they certainly made their points so it was all good, not much else exciting happened in this round, it was good that the assault marines managed to kill the ethereal though.

Gavin
Sam was treating the Drop Pods as if they were Land Raiders in this turn, putting nearly all his firepower towards them. Why he was so terrified of 2 Storm Bolters I will never know.

Brav Turn 5

  • The Falcon finally arrives, along with the Whirlwind.
  • Mephiston fails his psychic test yet again!
  • The Wave Serpent destroys a gun on the devilfish, and the Baal wipes up a Fire Warrior squad. The Falcon destroys the last Devilfish.
  • The mighty whirlwind misses it's first and only shot.
  • The rest of the infantry optimise their positions, getting into cover.
  • Combat - A crisis suit fighting the tactical marines takes a wound. The Tau retaliate by killing 2 tactical marines. The assault marines in combat with the crisis suits avenge the terminator by killing both bodyguards and a drone in the commanders squad.

Brad
A good performance from the assault marines yet again, it was good to see, especially for Gav since he didn't have much else left.

Gavin
Whirlwinds - why are they so useless?

Sam Turn 6

  • The last Hammerhead finally arrives and takes up position on the flank of the Baal and Falcon, Sam celebrates prematurely.
  • A Broadside blows up the Whirlwind with ease, with the second Broadside taking out the assault cannon on the Baal predator.
  • The Hammerhead kills 4 Dire Avengers, their morale holds.
  • Combat - Assault marines kill 2 gun drones, the Tau commander kills 2 marines. The devastators and tactical marines kill one bodyguard and wound the commander twice.

Sam
Here I should have moved the Hammerhead on in a different place, perhaps away from the Falcon in order to destroy the Dire Avengers. It is annoying that it came right at the end where it didn't do much good.

Gavin
The Assault Marines seem to have slowed down here, which is a pity.

Brav Turn 6

  • The Fire dragons disembark from the falcon and proceed to annihilate the Hammerhead. The Falcon takes out the Broadsides' drones.
  • The Wave Serpent attempts to finish off the Kroot but only kills a hound.
  • The Farseers spells combined with the Dark Reaper exarch finishes off the last fire warrior squad.
  • Combat - The assault marines take out two drones, while the tactical marines finish off a bodyguard.

Brad
Mostly just mopping up here but all in all it was a good turn. I was thinking the Fire Dragons weren't going to do anything, and I was unsure of their abilities when facing a skimmer but it turns out they live up to their position as tank hunters and kicked ass. We almost got full points for the Kroot squad but that little jammy git was left at the end.


Result

Brad - Major Victory
Gavin - Minor Victory
Sam - Loss

We decided on this result because while Team Brav annihalated almost all of Sams army (and would have mopped them up with ease given 3 more turns), Gavin lost 3/4 of his army, compared to Brads 1/4 losses.


- Gavin, Brad and Sam

Sunday, 12 August 2007

How to take a decent photograph.

Well since I've got the facilities, I thought I better take some photographs. Now Gavin has lent me his studio so I took some photographs using that, a daylight bulb and a tripod, using my Fuji Finepix F700.

Here are some of the better photos that I took:


  • Farseer painted by Brad.
  • Blood Angel, Ethereal and Crisis Suit painted by Gavin.
  • Fire Warrior painted by myself.

My apologies for not being able to play around with these images, but I blame the blog......

Anyway, onto tips. As you can see, I used the studio. The two colours for the background were blue and grey. Now personally, because I take a lot of photographs of bone, I love taking pictures with a blue background, it highlights the models extremely well and provides a good contrast to the models, enabling you to see the details easily. When I haven't done this was when I used Gav's blue Tau and Brad's Eldar. Personally, I would only use this unfrequently, preferably when using it for blue models, but it has reduced the shadows in those pictures.

I took the photographs using daylight and a GLS Bulb, a daylight bulb in other words. It was about 7 in the evening, in the summer and the light was at an angle and strong, coming through the conservatory window providing plenty of light. To prevent too much light getting into the lense I had the back of the studio to the window, so it only got indirect natural light, nothing else. I used the GLS bulb as a more direct source of light meaning I could play around with my direct lighting. I believe you can get these bulbs in the shops pretty cheaply too, so I recommend buying one if you are going to do some photography work. Hopefully Gav will provide the prices for each particular thing later on.

OK, onto the photography. Close up detail shots require either a steady hand, or the use of a tripod. These things prevent hand shake and are adjustable to the degree of photography you want, I believe you can pick them up at places like Jessops cheaply, even for small handheld cameras. Due to the height of the tripod, however, I was forced to raise the surface of the studio slightly with books in order to take the pictures at an angle I preferred, as you can tell. Finally, to take the photograph I used a macro function, allowing me to take close range shots of the subject. Check your camera manual for how to do it, as it will give a distance of focus at which you can take the photograph from, mine is 9cm. Take as many photos of your subject as you like, remember, if you are using a digital camera, you can delete your work, effectively being able to perfect your shots.

If you haven't got a studio, a contrasting surface and the daylight bulb will work just as well. My early photographs used the laminated floor of my bedroom and a white bookcase.

Hopefully this will help. This guide should assist you when taking photographs of objects. If you want, you can provide a scale too - a ruler in metric measurements is the usual measure, however if need be, using something unorthodox will work just as well like a thumb or even a pen, it all depends on what you have to hand. Anything which is of a known size will work.

Finally a few tips.

  1. Try messing around. Have fun, do different things and then play around with the images on your computer. Ensure that they are at least slightly accurate and keep a record of how you altered them if need be.
  2. For perfectionism, take pictures of small coins. Taking ones of multiple objects should challenge you.
  3. Have fun.

-Sam

Saturday, 4 August 2007

Some photos


Well as part of my degree I have to take close up photographs of small objects. As an exercise to help me I played with my camera and practiced taking some photos of my Tau. Here are two pieces I've done, a Tau Shas'ui Fire Warrior holding a sensor device and a conversion with a Fire Warrior using a pair of binoculars.

A few notes for these photos. I used a Fuji Finepix F700 camera on the floor of my bedroom against the white bookcase. By using the Macro function available on my camera I was also able to take the pictures 9cm away from the models in question. I also used a backlight of a desktop lamp to light up my little studio but if I had the time, I would have also included some reflected light, in order to light it up even more. With more time, I could have taken better photos but these will do for now.

- Sam

Friday, 3 August 2007

Mega Battle - 4000pt Tau

Well since I now have a free house with a big floor to play on, we are going to have one of our rare 40k games, with myself taking on Brad and Gavin in a 4000 point skirmish. As requested, I'm going to post my 4,000 point Tau army which Brad and Gavin will be attempting to beat using their combined 2,000 point forces of Blood Angels and Eldar. My list is as follows:

HQ

Shas'O Ukos
Plasma Rifle, Missile Pod, Shield Generator, Multi-tracker, Drone Controller, 2 Gun Drones, Stimulant Injector

Bodyguard

Tor, Twinlinked Plasmas, Shield Generator, Drone Controller and 2 Gun Drones, bonded and with a target lock

Kor, Twinlinked Missile Pods, Shield Generator, Drone Controller and 2 Gun Drones with a target lock


Aun'O Tor- Honour Blade, Drone Controller, 2 Shield Drones and with his Honour Guard: 12 Fire Warriors with a Shas'ui, markerlight, bonded and with a target lock


Shas'O Kais
Cyclic Ion Blaster, Missile Pod, Shield Generator, multi-tracker and bonded

Bodyguard
Shas'vre, Plasma Rifle, Missile Pod, shield Generator, multi-tracker, target lock

Elites

6 Stealths with a Shas'vre and 2 Fusion Blasters, the Shas'vre has a target lock and they are bonded

5 Stealths with Shas'vre and are bonded

Monat 1- Shas'vre, twinlinked plasmas, shield generator, Iridium Armour and a Fail Safe Detonator

Monat 2- Shas'vre, Fusion Blaster and Burst Cannon, Shield Generator, multi-tracker and a drone controller with 2 gun drones

Monat 3, Shas'vre with Airbursting Fragmentation Launcher, Burst Cannon, Shield Generator, multi-tracker and 2 gun drones

Shas'vre with 2 Shas'ui. Bonded

Shas'vre- Plasma & Fusion Blaster with shield generator and multi-tracker
Shas'ui- Plasma & Fusion Blaster with shield generator

Troops

5 Fire Warrior Squads with 12 men, Shas'ui, markerlight, target lock and bonded

20 Kroot with Shaper, Armour Saves and 2 Kroot Hounds

1 Devilfish with Target Array, multi-tracker, 2 Seeker Missiles, Decoy Launchers, Disruption Pod and Flechette Dischargers

Fast Attack

6 Pathfinders with a Shas'ui, bonded and 3 have rail rifles as well as having photon grenades

Attached Devilfish with Target Array, multi-tracker, 2 Seeker Missiles, Decoy Launchers, Disruption Pod and Flechette Dischargers-

10 Vespids with a Strain leader

Heavy Support

Shas'vre Broadside Monat 1- Shield Generator with Multi-tracker and drone controller with 2 shield drones

Shas'vre Broadside Monat 2- Shield Generator with Multi-tracker and drone controller with 2 shield drones

Hammerhead 1- Railgun with 2 Burst Cannons, multi-tracker, target lock, disruption pod, decoy launchers and 2 seeker missiles

Hammerhead 2- Ion Cannon with Smart Missile System, multi-tracker, target lock, disruption pod, decoy launchers and 2 seeker missiles

-------

Which brings up the grand total of 3996 points. Brad, and Gavin, when are you two going to post your lists?

- Sam

Thursday, 2 August 2007

For the Greater Good!


Hi, I'm Sam and I'm the Tau player. I try to theme my army around the Water caste world of Dal'yth, so my colour scheme is white armour with a black under suit, red highlights. Whilst I'm not that spectacular a painter, my positioning of the models combined with the colour scheme is alright and I've done a few nice conversions under the watchful eyes of Gav. My nemesis in 40k is the Blood Angels, the Death Company have terrified my troops too much now and I rarely win against them. Hopefully, the result will be different in the next battle which promises to be very big. 4,000 points for each army with Brad and Gav having a combined force of Blood Angels. More on that later but I might occasionaly produce a few battle reports, etc.

-Sam

Ordo Hereticus Inquisitor

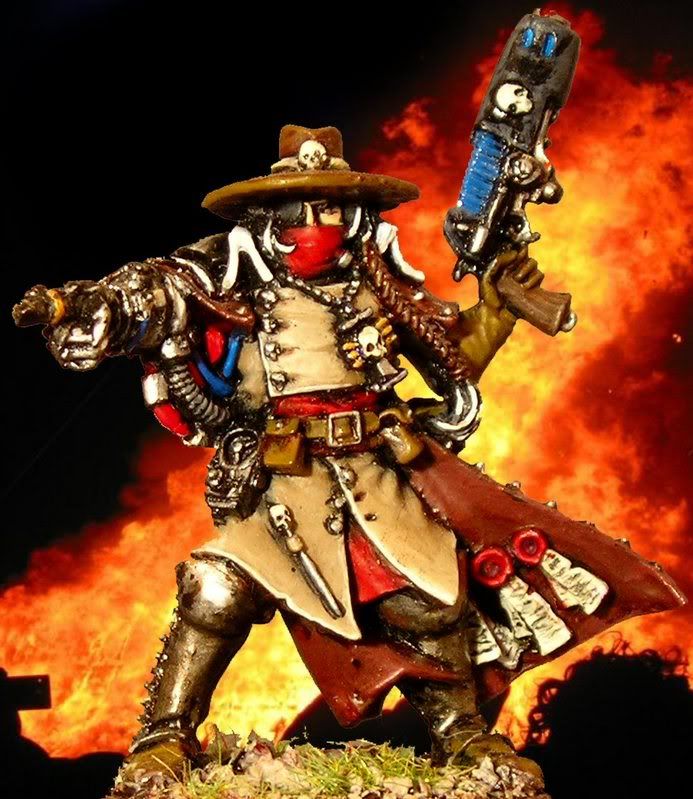
Behold my Inquisitor Lord - Tantalid. He's the witch hunter, in case you didn't guess. I painted this (limited edition) model for use in 28mm scale Inquisitor games, of which I have had one so far. He's probably my best painted model so far.

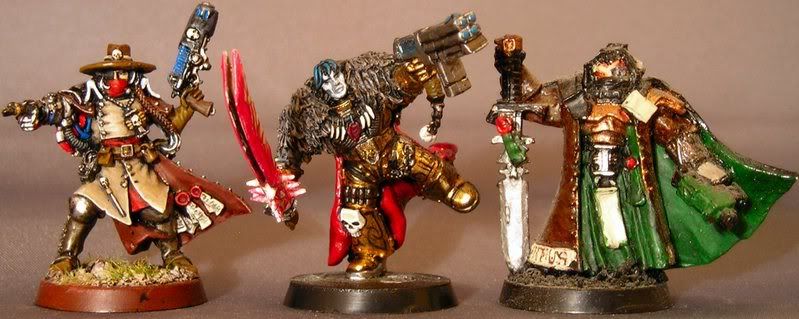
Below is a group picture, with his rivals. The dancing one was painted by Jason Evans, and the Green/Bronze Daemonhunter was painted by Sam Carter.


-Gavin

Related Posts with Thumbnails
 
meditation